Minecraft
What's installed on the Flora Family Minecraft Server, how to use it, and cool places to visit.
- Server Details
- Server-Side Plugins
- Celeste
- Simple Voice Chat
- Chunky
- Decent Holograms
- DynMap
- EssentialsX
- LuckPerms
- Multiverse
- Terra
- Vault Unlocked
- WorldEdit
- WorldGuard
- CoreProtect
- Craftin' with Chris
Server Details
What server are we running, what plugins are installed, what version is everything
Flora Family Minecraft Server
Docker Details
This minecraft server is running from a Docker Compose stack on the primary homelab docker host (terra.flora.family).
The docker instance spins up a java runtime environment with 6GB of dedicated memory. It uses the "Aikar" JRE settings as well to tune the server for performance.
We use the itzg/minecraft-server image and watch it with Watchtower to ensure that the image is as up-to-date as possible. However, we've pinned the minecraft server version to ensure that all plugins remain compatible (there's typically a delay between when the latest server version comes out and when the plugins are compatible with it).
Docker Compose File
Here's the /srv/minecraft/docker-compose.yaml file in full:
services:
  minecraft:
    image: itzg/minecraft-server:latest
    container_name: minecraft
    hostname: minecraft
    user: 110:986
    ports:
      - "25565:25565"
      - "24454:24454/udp"
    volumes:
      - /main/appdata/minecraft/serverdata:/data
    networks:
      - proxy_network
      - minecraft_network
    environment:
      EULA: TRUE
      MEMORY: 6G
      TZ: America/New_York
      USE_AIKAR_FLAGS: true
      ENABLE_ROLLING_LOGS: true

      VERSION: 1.21.5
      TYPE: PAPER

      # Current version of Dynmap compatible w/ paper isn't on Modrinth or Spigot
      # Currently needs to be installed manually.
      SPIGET_RESOURCES: 81862 # Celeste isn't on Modrinth
      MODRINTH_PROJECTS: |-
        chunky
        chunkyborder
        decentholograms
        essentialsx
        essentialsx-discord
        essentialsx-spawn
        essentialsx-chat-module
        luckperms
        multiverse-core
        multiverse-portals
        simple-voice-chat
        terra:beta
        vaultunlocked
        worldedit
        worldguard
    restart: unless-stopped
    depends_on:
      - mongodb

  mongodb:
    image: mongo:latest
    container_name: mongodb
    hostname: mongodb
    logging:
      driver: "none"
    restart: unless-stopped
    command: --quiet
    volumes:
      - /main/appdata/minecraft/mongodbdata:/data/db
      - /main/appdata/minecraft/mongodbconfig:/data/configdb
    environment:
      - MONGO_INITDB_ROOT_USERNAME=root
      - MONGO_INITDB_ROOT_PASSWORD=super_duper_tough
      - TZ=America/New_York
    networks:
      - minecraft_network

networks:
  minecraft_network:
    name: minecraft_network
  proxy_network:
    external: true
Minecraft Server
We're running a Paper server, currently (as of 7/19/25) at version 1.21.5. All plugins are server-side only.
There is one exception to the server-side plugin rule: Simple Voice Chat requires both the server plugin and a client-side plugin (using Fabric or Forge). There is a separate page with full details on how to get that set up for the client.
To Do
- Set up all plugins
- Celeste
- Chunky
- Chunky Border
- CoreProtect?
- Decent Holograms
- Dynmap
- EssentialsX
- Core
- Chat
- Discord?
- Spawn
- Luckperms
- Multiverse
- Core
- Portals
- Simple Voice Chat
- Terra
- Aeropelago
- Origen
- Overworld
- Substratum
- Vault Unlocked
- WorldEdit
- WorldGuard
Server-Side Plugins
A list and description of the minecraft plugins running on the server.
Celeste
What It Is
Celeste is a simple plugin that adds shooting stars to your Minecraft server. Inspired by the shooting stars from Animal Crossing and the falling stars from Breath of the Wild, this plugin brings some celestial ambience to your Minecraft world.
https://github.com/IdreesInc/Celeste
Useful Commands
/shootingstar [player] Summons a shooting star in the sky directly above the player. If no player is given, spawns one above the summoner.
Permission: celeste.shootingstar
/fallingstar [player] summons a falling star directly above the player. If no player is given, spawns one above the summoner.
Permission: celeste.fallingstar
Notes
During a new moon, you might see a meteor shower (a higher incidence of both shooting and falling stars). This is especially noticeable in The Feywild.
Simple Voice Chat
What It Is
Simple Voice Chat is pretty much exactly what it says - it provides a way to incorporate voice chat on the Minecraft server without going through a 3rd party service like Discord.
Client-Side Setup
While the Simple Voice Chat plugin is installed on the server, you also need to install a client-side plugin so that you can connect to the server and chat with other players.
Important Note: For Simple Voice Chat to function correctly, the client-side mod must precisely match the Minecraft version. Our server is currently running Minecraft Java Edition 1.21.8. Ensure you download the corresponding 1.21.5 versions of Fabric and Simple Voice Chat.
Install Plugin Loader
If you already have Fabric or Forge installed - great! Skip to the Simple Voice Chat section. If not, here's how to install Fabric - a lightweight, modern mod loader necessary to run the Simple Voice Chat mod.
-
Download the Fabric Installer:
- Navigate to the official Fabric website in your web browser:
https://fabricmc.net/use/ - Click on the "Download installer (Universal Jar)" button. Save the
.jarfile to your computer (e.g., in yourDownloadsfolder).
- Navigate to the official Fabric website in your web browser:
-
Run the Fabric Installer:
- Locate the downloaded
.jarfile (it will typically have a coffee cup icon). - Double-click the file to execute the installer.
- Troubleshooting: If the installer does not launch, ensure you have Java installed. You may need to right-click the file, select "Open With," and then choose "Java(TM) Platform SE Binary" or "Java."
- In the Fabric Installer window:
- Verify that the "Minecraft Version" is set to server version (see the top of this page for the current server version).
- Leave the "Loader Version" as the recommended default.
- Confirm the "Install location" is correct (it usually defaults to your
.minecraftfolder). - Click the green "Install" button.
- A confirmation message "Successfully installed Fabric Loader" will appear. Click "OK."
- Locate the downloaded
-
Verify Fabric Installation in Minecraft Launcher:
- Close your Minecraft Launcher if it is currently open, then re-open it.
- In the bottom-left corner of the Launcher, next to the "Play" button, you should now see a new installation profile. It will typically be named
fabric-loader-1.21.8or similar. This indicates Fabric has been successfully added.
Install Simple Voice Chat Client-Side Mod
With your mod loader installed, you can add the voice chat mod itself.
-
Download the Simple Voice Chat Mod File:
- Open your web browser and go to the official Modrinth page for Simple Voice Chat:
https://modrinth.com/mod/simple-voice-chat - Navigate to the "Versions" tab.
- Locate the version corresponding to Minecraft
1.21.8-2.5.35. You might have to go back a few pages (at the time I checked, it was 4 pages back). - Crucially, ensure you download the proper version for your mod loader! This will be explicitly stated next to the Minecraft version. So if you're using Fabric, get the
-fabric.jarversion. - Click the download button next to the correct version. Save the
.jarfile (e.g.,simplevc-1.21.8-2.5.35-fabric.jar) to your computer.
- Open your web browser and go to the official Modrinth page for Simple Voice Chat:
-
Locate Your Minecraft
modsFolder:- Open your Minecraft Launcher.
- Go to the "Installations" tab at the top.
- Hover your mouse over the
fabric-loader-1.21.8profile you created in Step 1. - A folder icon will appear on the right side. Click this icon. This will open your Minecraft game directory (
.minecraft). - Inside the
.minecraftfolder, look for a folder namedmods.- If the
modsfolder exists, open it. - If the
modsfolder does not exist, create it: Right-click in an empty space within the.minecraftfolder, select "New" > "Folder," and typemods(all lowercase). Then, open this new folder.
- If the
-
Place the Simple Voice Chat Mod in the
modsFolder:- Drag and drop the
simplevc-1.21.8-2.5.35-fabric.jarfile you downloaded from yourDownloadsfolder directly into themodsfolder you just opened.
- Drag and drop the
Launch and Configure Voice Chat
With both Fabric and the Simple Voice Chat mod installed, you're ready to use in-game voice.
-
Launch Minecraft with Fabric:
- Open the Minecraft Launcher.
- Confirm that the correct mod-loader profile is selected in the bottom-left dropdown. (for example,
fabric-loader-1.21.8) - Click the green "Play" button.
-
Join the Flora Family Minecraft Server.
-
Configure Voice Chat Settings (In-Game):
- Once in-game, press
vto open the Voice Chat Settings. - Within these settings, you can:
- Select your primary Microphone device.
- Adjust input/output volumes.
- Choose your activation mode (e.g., "Push to Talk" or "Voice Activity").
- Make sure your keybind doesn't conflict with another command. You can verify thise under
Options...>Controls...>Key Binds.
- Once in-game, press
Troubleshooting
Microphone Permissions on Windows
Windows security settings may block microphone access for new applications. If your microphone isn't working in-game:
- Open the Windows Start Menu.
- Type "Microphone privacy settings" and press Enter.
- Ensure that "Allow apps to access your microphone" is toggled to ON.
- Also, ensure "Allow desktop apps to access your microphone" is toggled to ON.
Microphone Permissions on MacOS
Since the Minecraft app doesn't request Microphone permissions, there's no way to enable them through the minecraft executable. Instead, you'll need to use a minecraft launcher.
- https://prismlauncher.org
Chunky
What It Is
This plugin pre-generates chunks in a defined area.
https://github.com/pop4959/Chunky
Useful Commands
chunky world [world] - select a world to chunk
chunky shape [shape] - define the shape of the area to chunk
chunky radius <radius> [radius] - define the size (X & optionally Z) to chunk. Preface the radius with + to expand on an existing area
chunky start - start the pregeneration process
Related Plugins
Chunky Border - set up custom world borders.
chunky border add - using the world, shape, and radius commands above to set a custom world border.
Decent Holograms
What It Is
A lightweight yet very powerful hologram plugin with many features and configuration options.
https://github.com/DecentSoftware-eu/DecentHolograms https://wiki.decentholograms.eu/general/setup/
Useful Commands
/dh h create <name> [-l:<world>:<x>:<y>:<z>] [--center] [content] - Creates a hologram
DynMap
What It Is
Dynmap is a Google Maps-like map for your Minecraft server that can be viewed in a browser. Easy to set up when making use of Dynmap's integrated webserver which works out-of-the-box, while also available to be integrated into existing websites running on Apache and the like. Dynmap can render your worlds using different renderers, some suitable for performance, some for high detail.
https://mcmap.flora.family https://dynmap.wiki.gg
Useful Commands
/dynmap quiet - Silence the rendering messages.
/dynmap fullrender [world] - Render the world's chunks to the map
How to Use
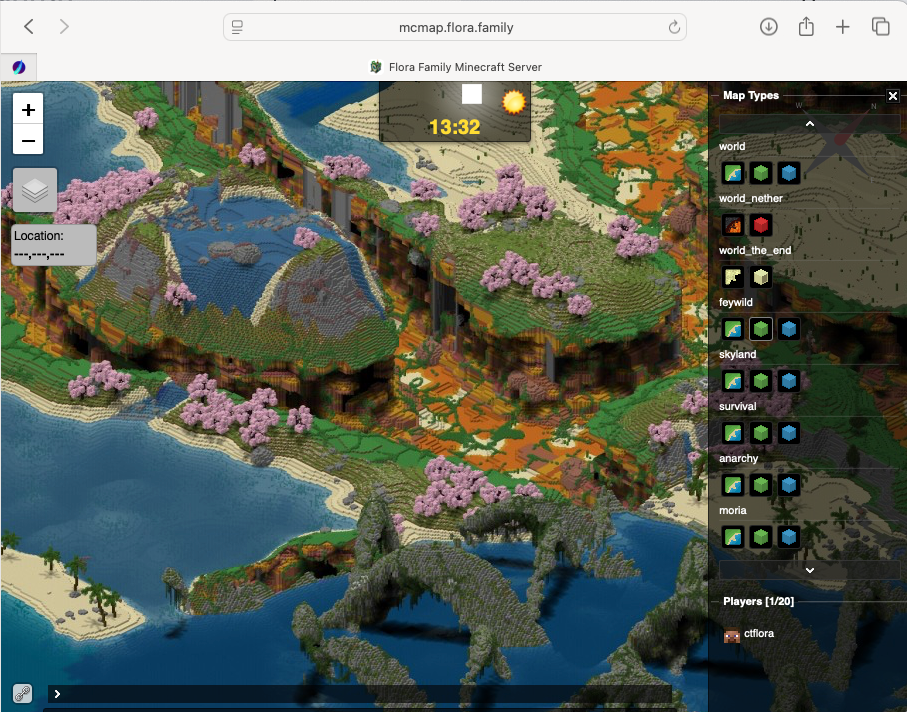
Right Sidebar
Use the right sidebar (collapsed by default) to choose the worldmap you want to see. Each world has a few options for the map.
- Flat Map (2-dimensional) - this one is probably the most useful.
- Isometric Surface Map (3-dimensional) - this one is probably the most cool!
- Isometric Cave Map (3-dimensional) - this one is also pretty cool, but it can get really busy.
There's also an online player list below the map list. Click the player and the map will switch to the world that they're in, centered on them.
EssentialsX
What It Is
With over 130 commands, EssentialsX provides one of the most comprehensive feature sets out there, providing teleportation, moderation tools, gameplay enhancements and more.
Just want the homes and warps? Great. Need a sign shop? Done. Want complex and rich kits with enchantments, custom books and lore? Sorted.
Whether you're a small group of friends or a huge server with hundreds of players, we've got the basics covered.
https://essentialsx.net/wiki/Home.html
Useful Commands
Way too many to list here! Check the wiki link above.
If you need something set in the EssentialsX config.yaml, let your friendly family server admin know!
Related Plugins
EssentialsX - Chat
EssentialsX Chat includes many of EssentialsX's chat features. It allows you to customise chat formatting on your server by adding prefixes, suffixes and colours in chat, as well as setting different formats for different groups.
You need Vault and LuckPerms to give players prefixes and suffixes and to detect groups.
EssentialsX - Discord
EssentialsX Discord brings a simple, lightweight, easy-to-use, and bloat-free bridge between Discord and Minecraft.
EssentialsX Discord offers essential features you'd want from a Discord bridge such as:
- MC Chat -> Discord Channel
- Discord Channel -> MC Chat
- Basic MC -> Discord Event Monitoring (Join/Leave/Death/Mute)
- MC Console -> Discord Relay
- Discord Slash Commands
- /execute - Execute console commands from Discord
- /msg - Message Minecraft players from Discord
- /list - List players currently online on Minecraft
For more information on how to set up EssentialsX Discord, check out the EssentialsX Discord tutorial!
EssentialsX - Spawn
EssentialsX Spawn lets you control where players spawn both when they first join the server and when they die. You can use the in-game /setspawn command to set a spawn location for everyone on your server as well as for specific groups.
LuckPerms
What It Is
LuckPerms is a permissions plugin for Minecraft servers. It allows server admins to control what features players can use by creating groups and assigning permissions.
With this, you can set very granular permissions per user and per group to allow those users and groups access to certain commands.
Plan
I'd like to set up three main groups: admin, moderator, and default. Admin has access to everything, moderator has access to most things, and default has "typical" player privileges.
Additionally, each user will have areas assigned to them (via WorldGuard) where they have additional privileges and other users have fewer privileges.
Lastly, certain worlds (especially survival and anarchy) will have specific privilege sets that are more or less restrictive than the regular worlds.
Multiverse
What It Is
World creation is provided by Multiverse-Core. It can control mob spawning, environment type, enable custom terrain generators, and much more! Despite being able to do all this, do note that Multiverse-Core does not create worlds itself, it simply makes calls to the Bukkit-API to create the worlds.
https://mvplugins.org/core/
Useful Commands
/mvtp [player(s)] <destination> [--unsafe] - Teleport to any destination (including worlds, portals, anchors, exact coordinates, other players (or their beds),
/mv anchor set <name> - Anchors make it simple to tag a location so you can get back to it easily with /mvtp.
/mv create <name> <environment> [--seed <seed>] [--generator <generator[:id]>] [--world-type <worldtype>] [--adjust-spawn] [--no-structures] [--biome <biome>] [--generator-settings <json>] - A whole new world!
mv create myworld NORMAL -g Terra:OVERWORLD - Example: create a world named "myworld" with the NORMAL environment and use the Terra plugin as the generator with the OVERWORLD Terra resource pack.
Related Plugins
Multiverse Portals
Multiverse-Portals provides portals between worlds, similar to vanilla portals, except the destination can go ANYWHERE, as opposed to just the nether.
https://mvplugins.org/portals/fundamentals/basic-usage/
Making a Gateway
In order to create a gateway, you need two portals: one on each end of the travel path.
To create a portal, you need a wand. The 'wand' is a special wood axe that allows you to create the portal. You'll want to have your portal structure already built and ready to go.
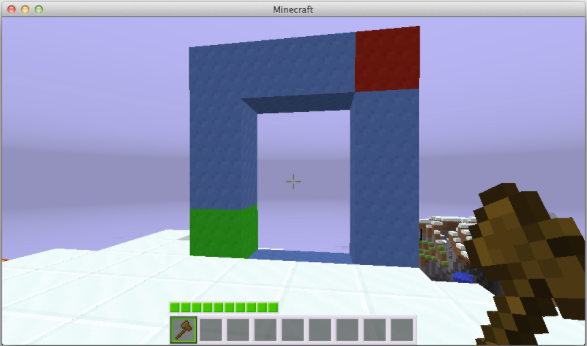
Identify the lower-left block of your portal (the green block in the image above) and the upper-right block of your portal (the red block).
//wand - Use this command to get the wand (ie, special wood axe). You'll use the wand to define the portal.
(left-click) - Left-click with the wand on the lower-left block. It'll look like you're attacking it, but it won't do damage. You should see "First position set to...".
`(right-click) - Right-click with the wand on the upper-right block. You should see "Second position set to...".
/mvp create <name> [destination] - Create the portal! If you don't have anywhere to link to, leave the destination off for now. If the other side of the portal exists, add it as the destination like "p:myportal".
/mvp modify <name> destination <destination> - Link your portal to a destination. This will typically be another portal, but doesn't have to be.
Terra
What It Is
Terra is a modern world generation modding platform, primarily for Minecraft. Terra allows complete customization of world generation with an advanced API, tightly integrated with a powerful configuration system.
https://terra.polydev.org/index.html
Useful Commands
Terra is actually used through other plugins, especially Multiverse Core.
Config Packs
Terra is a framework for generating Minecraft worlds. In order to actually generate a world, you need a config pack. By default, Terra comes with one called Overworld, but there's plenty of others available. Currently installed on this server are:
Overworld
The default overworld configuration for Terra 6.0+, containing over 140 different biomes.
https://github.com/PolyhedralDev/TerraOverworldConfig
Aeropelago
A Terra config pack themed around floating islands.
https://github.com/astrsh/Aeropelago
Substratum
A Terra pack that creates a completely underground world with several unique caves to explore within.
https://github.com/DeathShadez/Substratum
Origen
Origen focuses on adding a new and more creative / diverse terrain generation, without using any new blocks or items. This means that it is compatible with vanilla installations.
https://github.com/Rearth/Origen
Vault Unlocked
What It Is
VaultUnlocked continues the Vault Plugin into the modern era. While the plugin offers support for things such as Multi-Currency and enhances compatibility across plugins, it also maintains full backward compatibility with existing vault plugins.
The original Vault plugin is a dependancy of almost every single other plugin, but it hasn't been updated for over five years now. Vault Unlocked promises full backward compatibility with Vault and offers additional features.
https://github.com/TheNewEconomy/VaultUnlocked
Useful Commands
I have absolutely no idea, need to look into this.
WorldEdit
What It Is
WorldEdit is a powerful Minecraft map editor that helps modify, create, and manage your worlds easily within the game. This Minecraft plugin will help you build large cities, custom designs, and make the process faster with tools like copy-paste, brushes, and schematics.
https://worldedit.org
Useful Commands
There's so much it can do - definitely read through their website before messing with it. It's extremely powerful, both for good and for evil.
WorldGuard
What It Is
WorldGuard has a host of functions for server owners, server map makers, regular survival servers, and everyone else in between.
- Create zones in your world that only permit mods or certain players from building within
- Set additional game rules on your server (deny wither block damage, falling damage, etc.)
- Set game rules on specific areas (food regen, health regen, disable PvP, TNT, control mob damage) in your world
- Blacklist certain items and blocks so they can’t be used
- Add useful commands like an immediate “STOP ALL FIRE SPREAD” command.
- Protects against many types of abuse (tree growth, TNT cannons, piston machines, etc.)
- Certain interactions can also be allowed (door and lever usage, etc.)
https://worldguard.enginehub.org/en/latest/index.html
Useful Commands
Check out their documentation for details on how to use it. My primary use was to protect the players' homebase areas and the WorldHub area.
CoreProtect
What It Is
CoreProtect is a blazing fast data logging and anti-griefing tool for Minecraft servers.
https://github.com/PlayPro/CoreProtect/
Useful Commands
It's not installed yet, hopefully soon. Looks like it's not updated anymore since 1.20.something (or is behind a subscription paywall). Need to investigate alternatives....
Craftin' with Chris
A journal of my Minecraft Adventures!
Updating the Homestead
I spent a bunch of time getting the server working well, and at one point, flying around the World Hub, I saw my old homestead that Spencer & Benjamin built me! A nice little house on the edge of the forest.
Well, I spent a little time there sprucing the place up. First I mowed the grass - cleared all of the shaggy stuff from around the house. Then I brought a few more flowers over, especially in one spot near the front door. The campfire out front kept spitting sparks into the grass, so I made a glowstone pad for it, and then replaced all of the torches with lanterns & added a few.
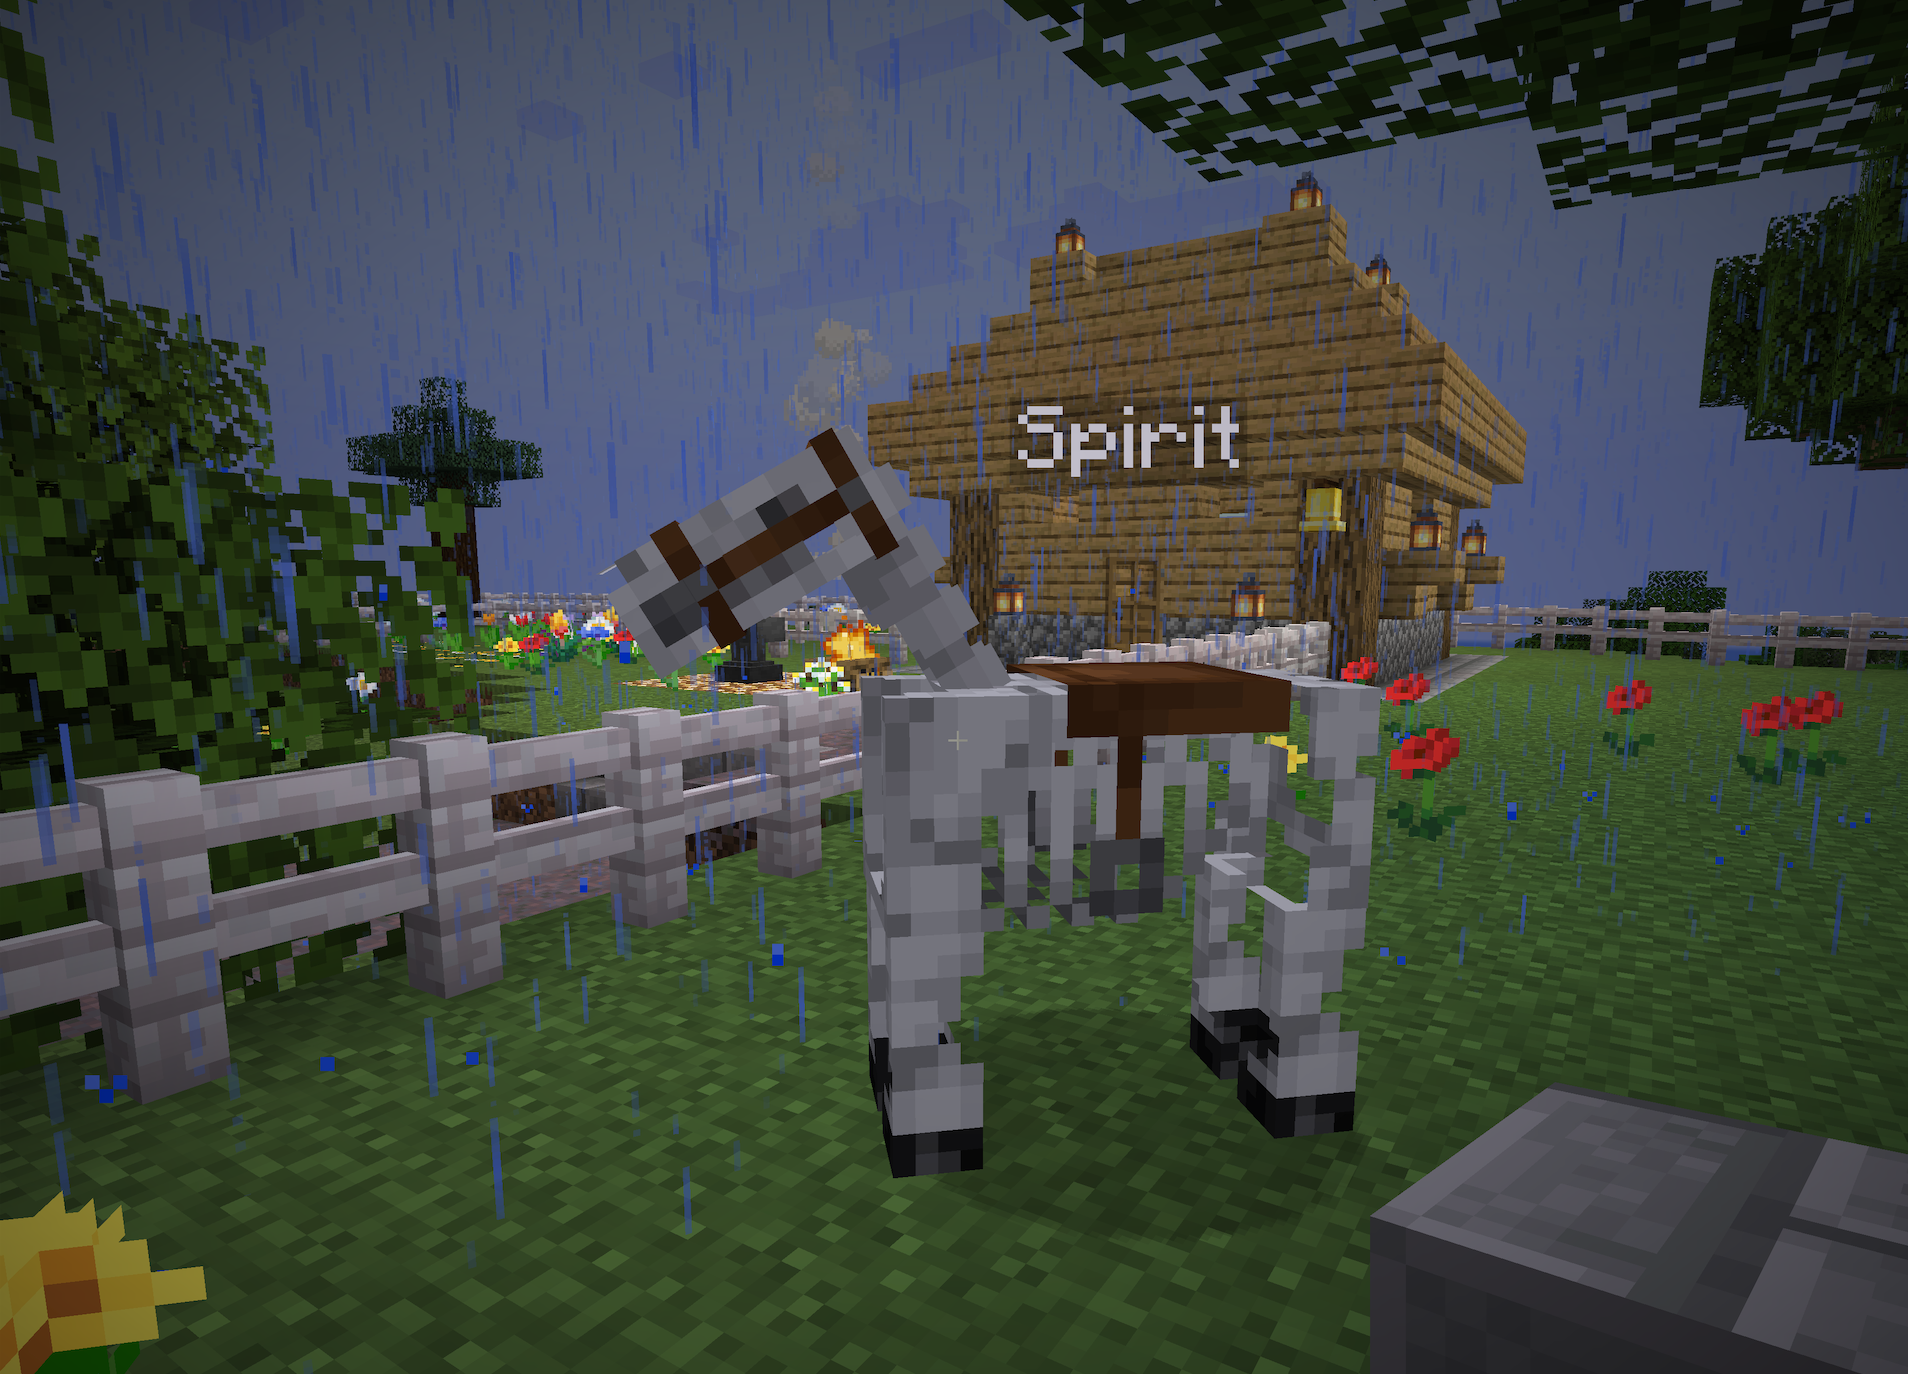
Then the weirdest thing happened (well, weird for me, I've hardly ever played minecraft). There was a skeleton horse! He looked really cool, so I walked up to get a better view, and then bam, I was hit by lightning and a bunch of skeletons riding skeleton horses appeared! Luckily I was in creative mode or that probably wouldn't have ended well for me, lol.
So I went back to fixing up my house - this time I put in a path from my front door all the way to the water, built a little dock & set down a boat. When I was done with that, I saw another skeleton horse! This one didn't turn into a bunch of other skeletons, though. I pulled out a saddle and jumped on him for a quick ride, then quickly made a big fence around my house for him to stay in.
Figured out how to name him, too! "Spirit" is probably the best name for a skeleton horse, lol. We're best friends, now.
Telperion
My first real build!
So there's this area in the main world that I've had my eye on for a while - it's essentially a crescent-shaped mountain with a big area in the middle, and I've always wanted to carve a nice home into the mountain, with some glass walls looking out over some sort of garden. Well, I finally decided to do it!
Welcome to Telperion
I started by making a giant Cherry tree in the center of the crescent. And I mean giant - it stretches all the way up to the clouds. I used WorldEdit to first make a base (I think 20b radius?), then I made 4 hollow cylinders